
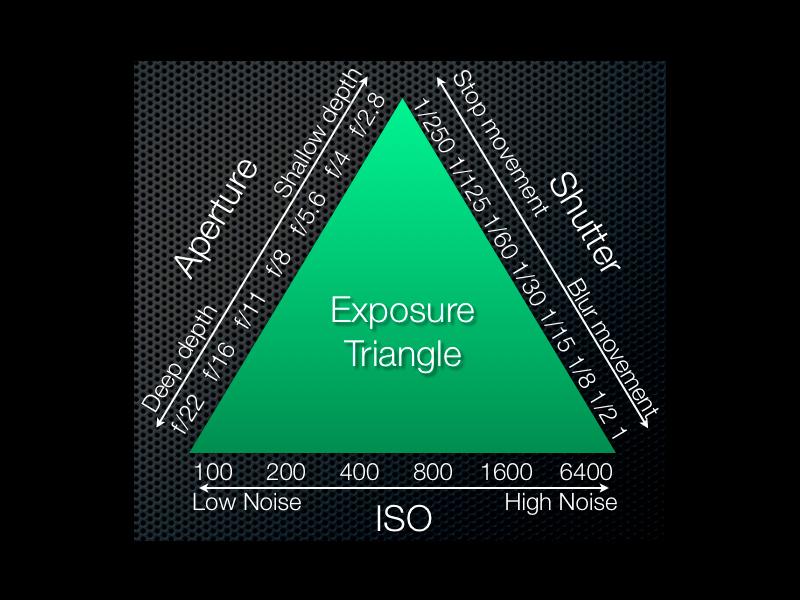
Venturing into manual mode will require an understanding the Exposure Triangle. The three pillars of exposure – ISO, shutter speed and aperture. The key to mastering these three elements is understanding their interdependence i.e. making a change to one aspect will affect the other two.
Once you become more accomplished as a photographer, you will soon find that the “Auto” functions on your camera do not meet all shooting situations. You will need more fine control to get those shots that are in non-standard situations, such as low light wildlife photography, taking images of the milky way or of the full moon.
The Three Pillars of The Exposure Triangle
ISO – This aspect of the exposure triangle is the indicator of your camera sensors sensitivity to the available light. The lower the setting (e.g. 100) the less sensitive the sensor will be to light. With a higher setting (e.g. 3200), the more sensitive your camera’s sensor will be to light. There is a trade-off, however, with the higher settings. The higher settings produce a grainy image, sometimes referred to as noise. If you would like to find out more detail about the use of ISO check out the article ISO in Digital Photography – A Beginners Guide
Shutter Speed – This setting controls the length of time the shutter in your camera stays open. In effect it controls the amount of light that reaches the sensor of the camera. The faster the shutter speed, the less light reaches the sensor, the slower the shutter speed, the more light reaches the sensor. A faster shutter speed will freeze motion in a shot, while a slower speed will show blur in a moving subject. This setting is normally indicated as a fraction of a second – e.g. 1/15, 1/60, etc. The higher the denominator (the number under the line), the faster the shutter speed. sensor. Read more about shutter speed here.

Aperture – This corner of the exposure triangle is essentially the size of the opening in the lens. This, similar to shutter speed, would also control the amount of light that reaches the sensor. The larger the opening, the more light will pass through. Conversely, the smaller the opening the less light will pass through. The effect of this is most visible in the background focus of the shot, referred to as depth of field.
The rule of thumb is that with a wide the aperture opening, the subject in the foreground will be in focus, and the background will be blurred (out of focus), and with a small aperture opening, both the subject in the foreground and the background will be in focus.
Aperture is indicated in “f” numbers, – f/1.4, f/2.0, f/2.8, f/4.0, f/5.6, f/8.0.
Wide or large apertures correspond with the small f-stop numbers available on your camera. So an aperture of f/2.8 is wide, while an aperture of f/8.0 is small.
We cover this topic in more detail in our beginners guide to aperture control.
Summary
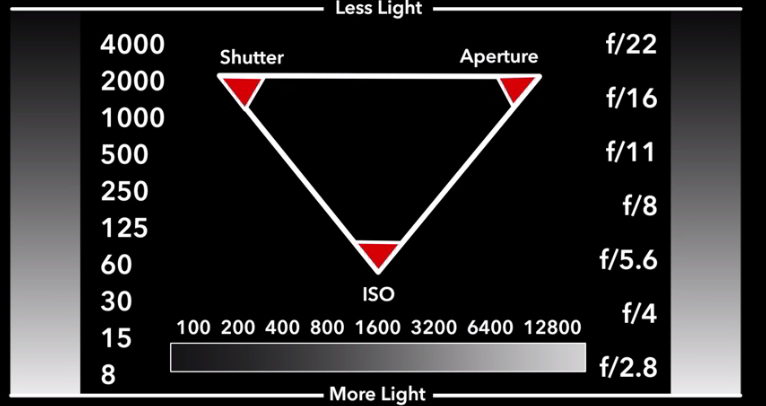
These three aspects of the exposure triangle have to be balanced in order to maintain a constant exposure. For example, if your increase the aperture, you will have to increase the shutter speed. This is to compensate for the additional light reaching the sensor. Likewise, if you increase the ISO, you would have to either decrease the aperture or increase the shutter speed. This will balance the amount of light reaching the camera sensor.
The rewards you will receive in the form of improvement in your images are well worth the efforts to become familiar with all the components of the exposure triangle.


